192.168.1.1 – Admin Login to configure your router
Facing low internet performance, do you want to kick some people off the internet, limit connectivity to devices, create a guest network, or more? The first step is to log in to your router’s admin page. To log in to the user console, you will need to find its IP address, as you can’t get access without a router IP. Here, we will use 192.168.l.1 to access the router dashboard. This is a thorough guide that shows you how to log in to 192.168.1.1 and make the necessary router settings.
What is 192.168.1.1?
It is a private router IP that is used by different brands across the USA to access their admin dashboard for configuration. The brands that use this as a default gateway include Spectrum, Linksys, ASUS, Tenda, older TP-Link, Netgear models, and many more. However, to use this IP, first you have to confirm whether your router has the same IP or if it has been changed by someone or the ISP (Internet Service Provider).
192.168.1.1 Login to Admin Page
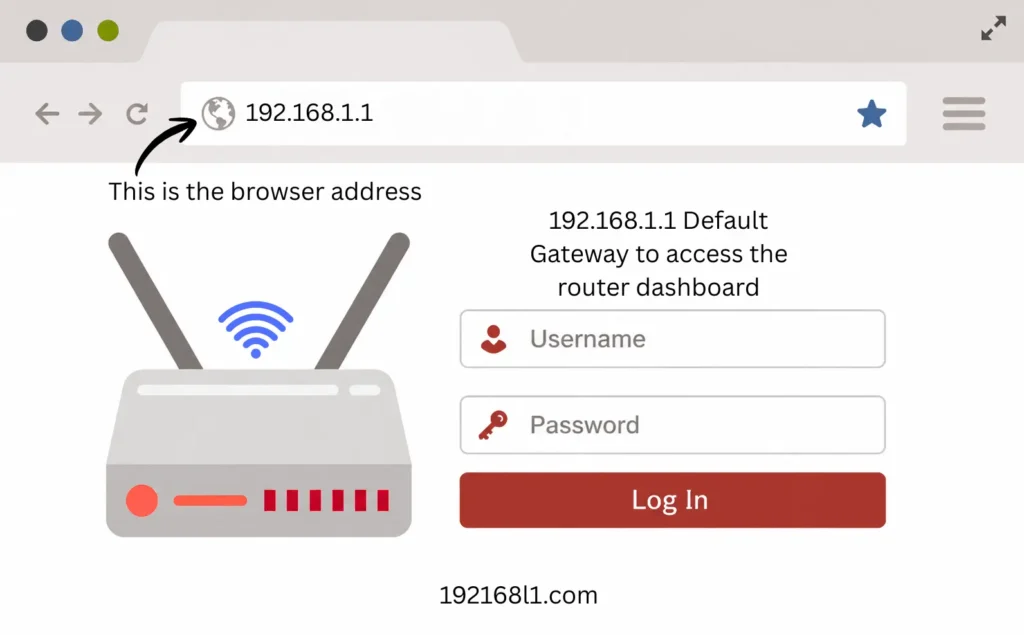
The login process is simple, so you don’t need to confuse yourself. In the browser URL search bar, type 192.168.1.1 and press Enter, or tap on the button to access it directly.
This is the default local IP based on the router you are using. In some cases, the login process may show errors, which I have explained below along with their solutions.
Correct Steps to Access 192.168.1.1 IP Address
You typed the IP in the URL area, but it is showing website results, or you clicked on the button, but it shows an error. Then this step is for you, as most people make mistakes that they don’t know about, but these mistakes prevent them from entering their router dashboard. Make sure to follow these steps correctly to resolve your login issues.
Connect Your Device to the Router Internet
Connect to the Wi-Fi network of the router you want to access. If you are connected to another Wi-Fi network, you will not be able to access its router dashboard. Make sure your device is not connected to another router’s Wi-Fi but to the router whose control page you want to access via 192.168.1.1. If you connect via mobile data, a hotspot, or a different internet connection and try to log in to this address, it will prevent you from doing so. That’s why the first and crucial step is to use the correct router Wi-Fi network.
Use the Browser Search URL Bar
A lot of people get confused between the browser address bar and a search engine, while both are different:
Browser URL Bar
- It is located at the very top of the browser. Using it to enter a website directly means it expects a precise website address (e.g., google.com) and then takes you to the site you are interested in. Modern address bars also show you general queries. If you enter a query without an extension (for example, .com, .us, 192.168.1.1, or any other), they instantly look up the query on the web by sending your text straight to your default search engine.
Search Engine
- A search engine shows us different web pages when we type our query, even with an extension. When entering any query, it will feature a search bar that scans billions of indexed web pages to provide a list of options based on the words typed. For example, if you type 192.168.l.1, it acts like a search engine and shows you a page of Google or Bing results.
Want to enter your router admin console? Open the browser you are using and type 192.168.1.1 into its address bar. When you type it and click Enter, it acts like a URL bar and takes you there.
Key in Your Router Username and Admin Password
Don’t be confused between your Wi-Fi credentials and your router admin credentials. Both are different and are used for different purposes.
Wi-Fi Credentials
- The Wi-Fi password and name (SSID) are used to connect our devices to the router internet.
Admin Credentials
- We use the username and admin password to access the router user control panel.
Once the login window appears, type your admin access key and username in their respective fields, and then click on Login.
Important Note: The default admin password and username are printed on the physical router’s backside.
After doing all these steps, if it still shows a login error, then the issue is something else. You can find the reason and its solutions below.
192.168.l.1 Login Error Reasons
Once you perform the whole process and it shows errors such as “This site can’t be reached” or “Took too long to respond,” then it means you are doing the steps correctly, but there is something that is not letting you get into the login page. Below are the reasons I have explained. I would suggest you give each one a try, one by one.
Router Has a Different Default IP Address
Some users buy a second-hand router from another person who has changed the default gateway to something else, or the router is new, but the Internet Service Provider has changed the IP due to some reasons. In this case, you have to follow the method that I have explained below. Look for the heading “How to Find the Router Default IP Address.”
Using a Wireless Connection
Sometimes, the internet has issues with a wireless connection, like the signal is dropping or the Wi-Fi has a load because different devices are connected to the router Wi-Fi.
Using the HTTPS Internet Protocol
Most old-model devices do not load the modern internet protocol HTTPS, but they work best with the old internet protocol HTTP.
Cache and Cookies
The browser cache is a small temporary storage area that stores website elements like images, scripts, and logos the first time you visit a site. When you enter the site again, it uses the stored data, which can sometimes cause errors like these.
Using WWW or .COM
This is a default IP, so you don’t need to type www or .com. If you do so, it can prevent you from logging in to the admin window.
Active VPN
If an active VPN gives access to restricted sites, then in some cases, it can also restrict access to sites that can be opened without a VPN.
Active Firewall and Antivirus
If these two are on, they can also cause issues while you are browsing or accessing something.
Typo in 192.168.1.1
Entering the address incorrectly is another common mistake. I have seen users enter 192.168.l.1 or 192.168.l.l, which is wrong because you are typing l or i instead of 1.
Troubleshooting Login Errors
If there is a reason for something, then there must be a solution for it. The same is the case here. If you are facing login errors, you can also solve those issues. Follow the steps:
Find the Correct Router IP
If 192.168.1.1 is not working, you have to find the correct IP. You can do it by a different method, which I have explained below.
Use a Wired Connection
Instead of a wireless connection, use a wired connection (Ethernet cable).
Use Both Internet Protocols
Give both protocols a try, one by one. First, use the HTTP protocol. If the issue still persists, then use HTTPS, as it may solve the error.
Clear Your Browser Cache
Sometimes, the cached page can also cause this issue. To clear the cache, press Ctrl + Shift + Delete on a Windows device. It will open the Delete Browsing Data menu. Then select Cached images and files and click Delete data.
Type the address without WWW and .COM
Don’t type www or .com with the address, as these are not necessary and can cause login issues.
Close VPN and Firewall
If either is active, please turn it off, as these can cause issues and restrict the user from entering their router admin panel.
Don’t Make a Typo in the IP
Make sure you are entering the IP without any spelling mistakes. The correct default IP is 192.168.1.1. Match your IP with this one and then press Enter.
How to Find the Correct IP Address on Your Device
If the default router address 192.168.1.1 doesn’t open the login page, it may have been changed by the previous user or the ISP. In this case, you have to find the correct IP your router has assigned. The first thing you should do is find your device’s Default Gateway. This is the correct IP address your router uses on your local network. Since many routers use different IP addresses, checking it on your device is more reliable than guessing.
The steps I have defined below will help you find the correct router IP on different operating systems.
Find Router Private IP on Windows
Find it on Windows in just a few steps.
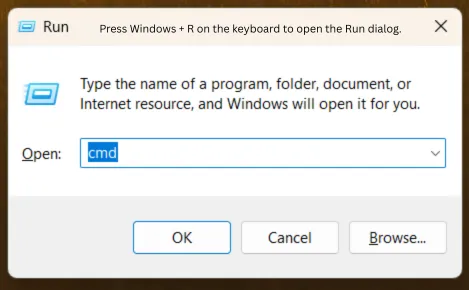
- Press Windows + R to open the Run dialog.
- Type cmd and press Enter.
- In the Command Prompt, type ipconfig and press Enter.
- Look for Default Gateway under the network adapter you are currently using (Wi-Fi or Ethernet).
- The number shown next to Default Gateway, i.e., 192.168.1.1, is your router’s IP address.
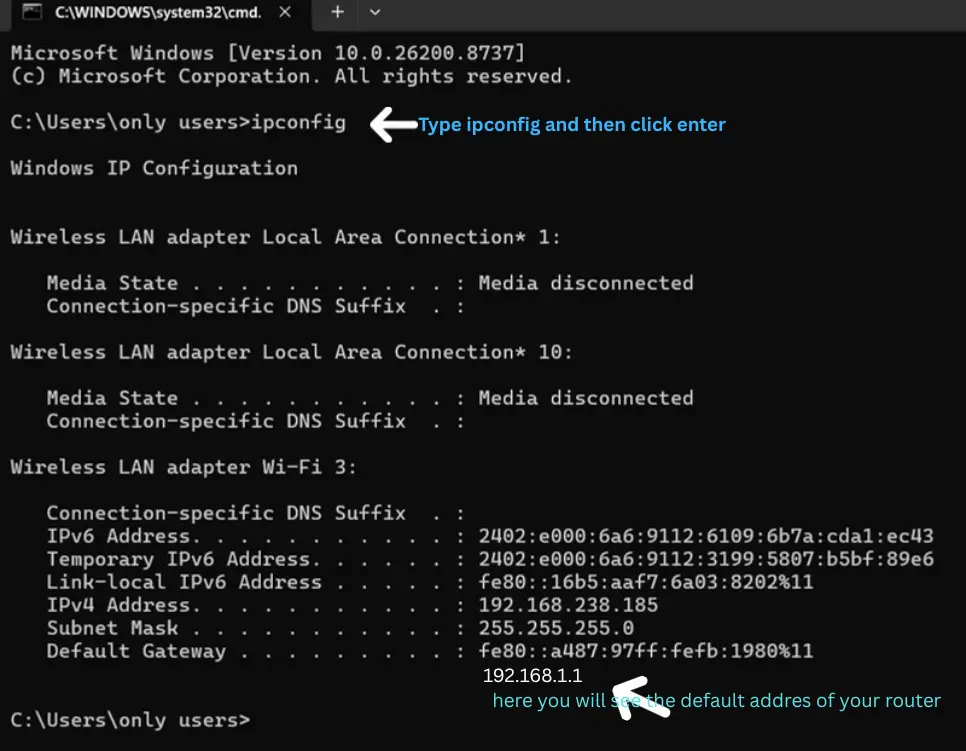
For example, if the default gateway shows 192.168.1.1, enter that address into your browser’s address bar to access the router login page.
How to Find It on macOS
If you are a Mac user, you can find the router IP through the network settings.
- Open System Settings (or System Preferences on older versions).
- Select Network.
- Choose your connected network.
- Click Details or Advanced, depending on your macOS version.
- Open the TCP/IP section.
- The value listed beside Router is your router’s IP address.
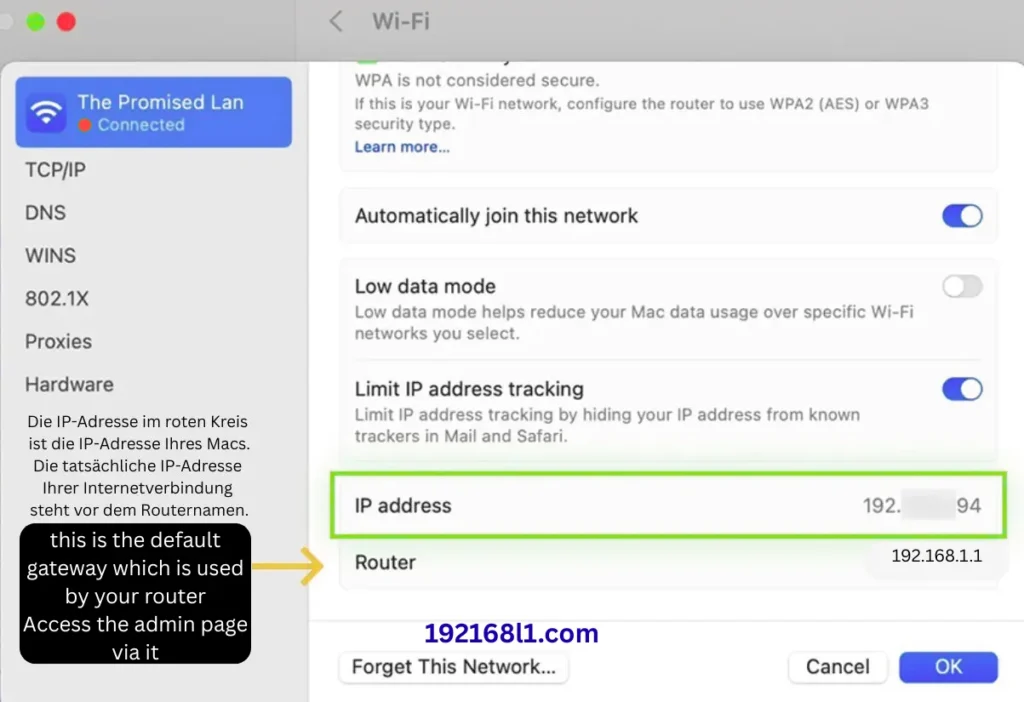
Find It on an Android Mobile Phone
It is an easy and quick method. Most Android phones display it in the Wi-Fi settings.
- Open Settings.
- Tap Wi-Fi.
- Select the Wi-Fi network you’re connected to.
- Open the network details.
- Look for Gateway or Router.
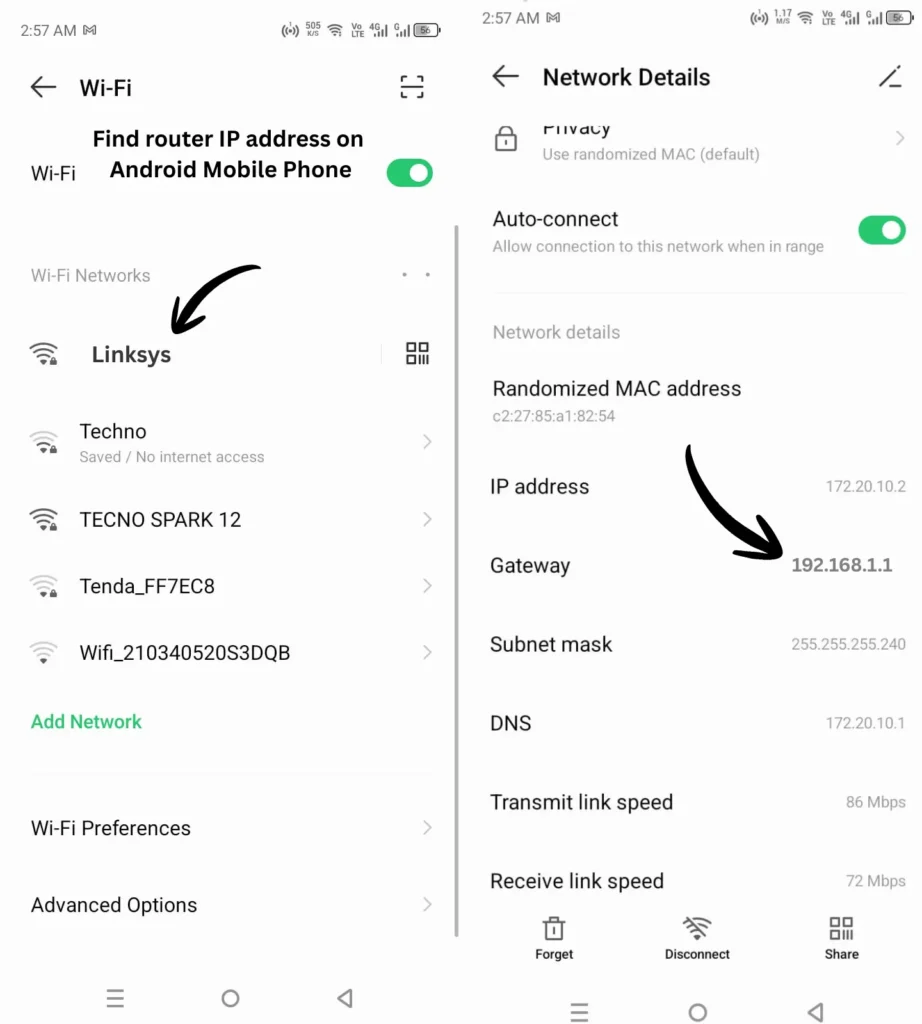
The number displayed is the address you should use to access your router.
Important Note: The menu names may be slightly different depending on your phone brand and Android version.
On iPhone or iPad
You can also check the router address from your Wi-Fi connection details.
- Open Settings.
- Tap Wi-Fi.
- Tap the ⓘ icon next to your connected network.
- Scroll to the Router field.
The value shown there is your router’s local IP address.
On Linux
Linux users can find the router IP using a terminal command.
- Open the Terminal.
- Type the following command and press Enter: ip route
- Find the line that starts with default via.
The IP address that follows is your router’s default gateway.
Why Checking the Router IP Is Important
If you are one of those who assume every router uses the same login address, that’s not always the case. Depending on the manufacturer or a previous network setup, your router may use a different local IP address. Finding the default gateway on your device removes the guesswork and helps you reach the correct login page without trying multiple addresses.
Why We Access the Router Admin Page
Accessing the router page becomes crucial for different reasons because we have connected our Wi-Fi to different people’s devices, which can cause our internet to slow down. We may want to limit users, create parental controls so our children don’t use it outside the scheduled time period, limit internet usage, or change the Wi-Fi password and name so intruders don’t enter our Wi-Fi and steal our privacy and data. In simple words, we log in to the router page to make configurations that make our internet more secure and safe.
How to Configure My Router
First, you have to enter the router login page via its IP address, 192.168.1.1, then enter your user key and click Login. Now you will enter your router console page, where you can make the configuration. Set up the router for the first time? I would suggest changing the default credentials to secure ones, as these are visible to every visitor and can be viewed on the router’s printed sticker.
Change the Wi-Fi Password
Changing the Wi-Fi password is crucial because if it is easy to guess, intruders can enter your internet and steal your confidential data without your awareness. Follow the steps below:
Log in to the IP Address 192.168.1.1
The first step in changing the password is to log in to the router using its local IP.
- Open the browser you have on your device.
- Type this IP into its URL bar at the top.
Enter Admin Password
- Enter the user key shown on the router sticker.
- Click on Login.
Go to the Wireless Menu
- From the left-side menu, click on Wireless.
- Then click on Wireless Security.
- In the password field, the existing password will be shown. Remove it and enter a new password.
- Once you enter the updated password, click on Save.
Reboot Your Router
When you provide the WLAN key and save the settings, a notification will pop up asking you to reboot your router. You must click on it; otherwise, your settings will not be saved until you restart your router.
Important Note: Once you change the WLAN password, all the devices that are connected to the router’s WLAN network will disconnect. Now, you have to enter the new WLAN password to connect and use the internet.
The Wi-Fi password is different from the router’s admin password. The Wi-Fi password connects devices to your network, while the admin password lets you access the router settings.
How to Change Modem WLAN Name
The process is simple and the same as changing the Wi-Fi password.
Login to the Admin Area
- First, log in to the router user page through its IP address.
Go to the Wireless Section
- From the left-hand menu, click on Wireless, then from the submenu, click on Wireless Settings.
- In the Wireless Network Name, which is also called SSID, enter the new WLAN name.
- In the same field, the Wi-Fi name will be mentioned. If you want to change it, enter a new name, or keep it as it is.
What are the most common IP addresses?
Most people think all routers have the same private IP, which is not right; every router uses a different IP while some may have the same. The most common IP addresses are below:
- 192.168.1.1 (used by most router brands)
- 192.168.0.1
- 192.168.10.1
- 192.168.100.1 (some fiber routers)
- 192.168.8.1
- 10.0.0.1
- 192.168.
- 192.168.1.254
Router Factory Reset
A factory reset restores your router to its original settings by removing all custom changes. This includes your Wi-Fi name (SSID), Wi-Fi password, administrator password, guest network, parental controls, and any other settings you’ve configured. It’s a useful option if you’ve forgotten the router login password, can’t access the settings page, or need to start with a clean setup.
Method 1: Reset Using the Reset Button
Almost every router has a small Reset button on the back or bottom of the device. Leave the router powered on, then press and hold the button with a paperclip or SIM eject tool for 10 to 15 seconds. When the LEDs start flashing or the router restarts, release the button and wait a few minutes. Once the reset is complete, the router will return to its factory settings, and you’ll need to set it up again.
Method 2: Reset Through the Router Settings
If you can still access the router’s admin page, you can perform a factory reset without using the physical button. Log in to the router, then open the System, Administration, Maintenance, or Device Management section, depending on your router model. Select Factory Reset, Restore Factory Defaults, or a similar option, then confirm your choice. The router will reboot automatically and erase all custom settings, including your Wi-Fi name, password, and administrator credentials.
Important Note: Factory reset your router only if you have no other options because it will remove all the configurations, and you will have to set it up again from the start.
Once you factory reset your router, you will need to log in with the default credentials, not the ones you have customized.
FAQs
Conclusion
Accessing the 192.168.1.1 router admin page is simple once you know the correct IP address and login details. If the page doesn’t open, first make sure your device is connected to the correct router Wi-Fi or use an Ethernet connection, then check the default gateway to confirm the router IP. You can use the admin page to change the Wi-Fi name and password, manage connected devices, set parental controls, and make other necessary configurations. If you forget the admin password or cannot access the settings, a factory reset can restore the router to its default settings. After making any changes, always use a strong Wi-Fi and admin password to keep your network secure.